Parallel connections and series connections are the two different orientations for joining battery cells (or any electronics, for that matter).
It is absolutely critical that you understand the difference between parallel and series connections before you begin building your battery. If not, you could end up in a dangerous situation of short circuiting battery cells and causing a fire. Don’t worry though – parallel and series connections are super simple to understand. Once you know how they work, you’ll know exactly how to avoid dangerous scenarios and safely build a battery.
Parallel connections
We’ll start with parallel connections. A parallel connection between battery cells is a connection where all of the positive terminals of the cells are connected together, and all of the negative terminals are also connected together, but separately from the positive terminals.
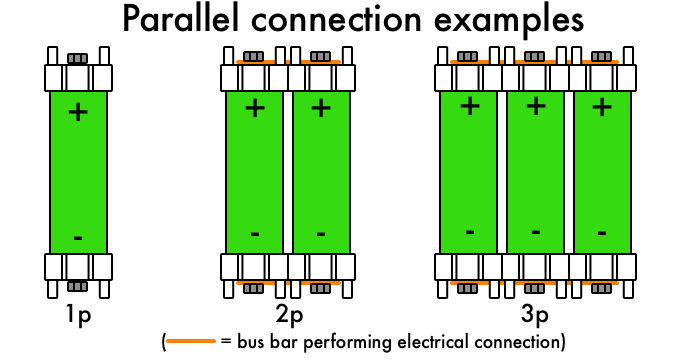
The diagram above shows a single cell, two cells connected in parallel and three cells connected in parallel. Theoretically, you could connect an infinite number of cells in parallel simply by lining up the cells and connecting all of their positive terminals together and then all of their negative terminals together.
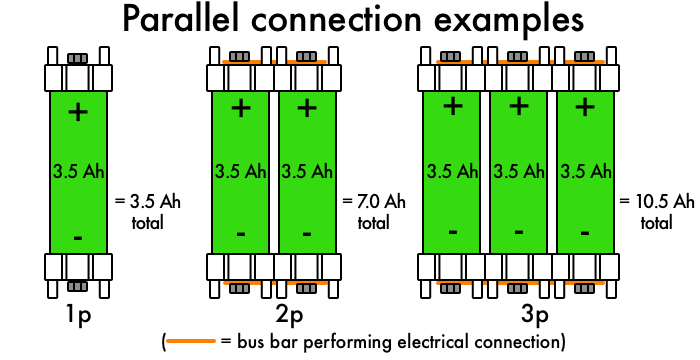
When you connect battery cells in parallel, you increase their capacity. Basically, you are creating one big cell out of several smaller cells. The total capacity of the combined cells is equal to the number of cells connected in parallel multiplied by the capacity of each cell. For example, if you use 3.5 Ah cells and you connect two cells in parallel, you’ve created a single 7 Ah cell. If you did the same with three cells, you’d create a 10.5 Ah cell. You can see this demonstrated in the diagram below.
So now you understand how parallel connections work and how they create larger battery cells with more capacity. These larger cells are often referred to as parallel modules, parallel groups, or sometimes just “modules” or “groups” for short.
The other added benefit of creating parallel groups like these is that they can support more current than the single cells they are made from. For example, let’s say that these cells we are connecting in parallel can each support 5 amps, or 5 A. That means that a single cell can power a 5 A load, but it can’t power a larger load or it might overheat. If we have two cells in parallel though, we can double the current carrying capacity of the cells. By creating this two-cell module, we can now power a 10 A load. If we combine three cells in parallel, this three-cell module can support a 15 A load, and so on. That is how you can create higher power batteries simply by adding more cells in parallel. Even “weak” cells that can’t support much power can be connected in parallel, and a sufficient number of them can power a high-power load. But it is always important to ensure that you have enough parallel cells to support your load.
Series connections
Now it’s time to talk about series connections. Series connections are essentially the opposite of parallel connections. In a series connection, you connect the positive terminal of one cell to the negative terminal of the next cell. Think about it like pushing battery cells into a flashlight. When all the cells go into a tube, they line up with the positive terminal of each cell pressing against the negative terminal of the next cell.

When using the VRUZEND kits, you can’t line the cells up in a line directly like the cells above. Instead you will use the bus bars to create the same electrical connection in a different physical orientation. So the cells will be placed differently, but it will be the same thing, electrically speaking.
To do this, we’ll need to place every other cell upside down. Basically, we’ll alternate between the positive terminal and negative terminal on each cell facing up. The diagram below shows how we can create the same series connection between three cells using the VRUZEND terminal caps.
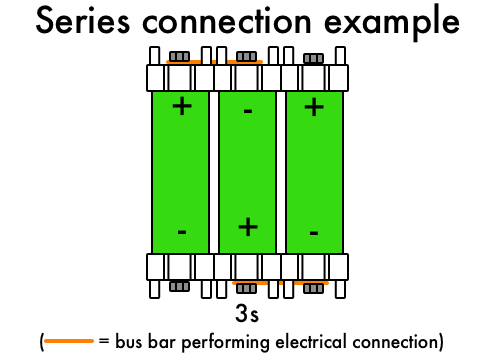
This is the same thing as the three battery cells in a line, except that now they’ve been placed next to each other. Instead of butting up the terminals, the terminals are connected by the bus bars. Either way, the cells are still connected with positive to negative connections between every cell, which makes this a series connection. This process can be extended, theoretically indefinitely, to make long series connections of many cells. The diagram below shows eight cells connected in series.
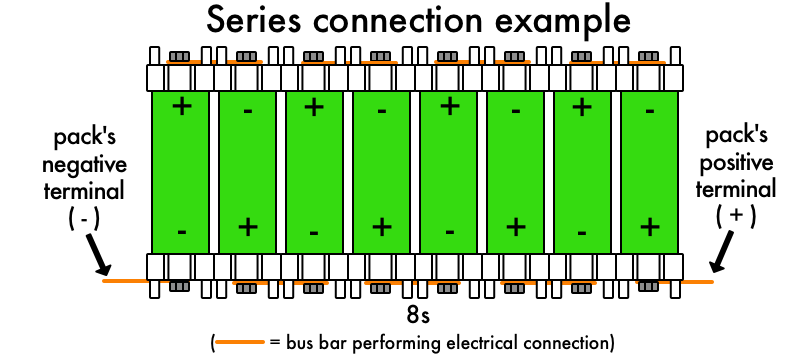
Note how in the diagram above, each bus bar performing a series connection alternates. For example, the top of the first two cells are connected, but the bottoms of the same first two cells are not connected. For every bus bar performing a series connection on the top of the cells, the same location is not connected on the bottom of the cells, and vice versa. This is extremely important. If you were to connect both the top and bottom of the cells in this orientation, you would create a short circuit. This is because the cells are in an alternating orientation, with the positive end of each cell either up or down, opposite to the orientation before and after the cell.
Remember, parallel cells are connected at both the top and bottom of the cells, but that is only because those cells all face the same way. When the cells face opposite directions, and thus when you are performing a series connection, you have to be careful not to connect both the top and bottom of the same cells. You’ll know that you made this mistake immediately because the bus bars will create sparks when they touch the cell terminals, completing the short circuit.
Series connections don’t change the capacity of the cells, measured in amp hours, like parallel connections do. Instead, series connections change the voltage of the combined cells. For instance, in our 3s example, we have 3 cells in series. If each of these are 3.7 V nominal cells, then we’ll simply add up the voltages of all of the cells in series. For our 3s pack, that would give us 3.7 V + 3.7 V + 3.7 V = 11.1 V. Alternatively, you can multiply the number of cells in series by the voltage of each cell. So again, with our 3s pack, we’d have 3 cells x 3.7 V = 11.1 V total. For our 8s pack, we’d have 8 cells x 3.7 V = 29.6 V total.
Even though the total voltage changes with series connections, the capacity in amp hours will remain the same. So if we used 3.5 Ah cells in these examples, even though we have a 3s pack creating an 11.1 V pack, the capacity of that pack will still be 3.5 Ah, giving us a 11.1V 3.5Ah battery pack.
Combining parallel and series connections
To build a battery pack, you will almost certainly be combining both parallel and series connections. The parallel connections will increase the capacity of the battery pack, and the series connections will increase the voltage. By controlling the number of cells in series and parallel, you can get the exact voltage and capacity to meet your needs.
For example, let’s say that we want to build a 36V 10Ah battery. We’ll start with the capacity. To reach 10 Ah, we’ll need multiple cells in parallel. If we have 2 Ah cells, we’ll need five of those cells in parallel to get 10 Ah. If we have 2.5 Ah cells, we’ll need four of those cells in parallel to get 10 Ah. If we used the 3.5 Ah cells from the examples above, we could use three cells in parallel to get 10.5 Ah, which is very close to the 10 Ah we are looking for. By connecting those cells in parallel, we are creating parallel groups that are each approximately 10 Ah each.
Next, we’ll look at voltage. We can achieve the 36V that we are looking for by using multiple cells in series. Ten cells in series, if each has a nominal voltage of 3.7 V, would give us 37 V. That’s very close to our 36 V that we’re looking for.
That means that our final pack will have three cells in parallel (assuming 3.5 Ah cells) and 10 cells in series. This would be known as a 10s3p pack, using shorthand notation common in the battery building industry.
There a multiple ways to build a pack like this, but a common method would be to first create 10 parallel groups of three cells each, and then connect those 10 parallel groups together in series. With the VRUZEND kit though, we could snap together all 30 of the VRUZEND terminal caps for each side, then place the cells in all together and press the two sides of caps together. Then we’d use our bus bars to make our series and parallel connections.
| About The Author | |
|---|---|
 |
Micah Toll is a mechanical engineer, lithium battery builder and ebike educator. He’s written multiple books including DIY Lithium Batteries and The Ultimate DIY Ebike Guide. When he’s not tooting around Tel Aviv or Florida on his ebikes, you can probably find him reading, writing, running or vegging out on the couch. |

