One of the best ways to seal your battery is by using heat shrink. It can protect your battery from short circuits, seal your battery against the weather and add a professional look to your DIY battery.
Choosing heat shrink
There are many different types of heat shrink available. For our purposes, we’ll generally be looking for large diameter heat shrink. This will be large enough to fit our batteries.
There are also different styles of heat shrink. Not only does it come in different colors, but different materials are available as well. Most large diameter heat shrink is a fairly thin PVC heat shrink.
PVC heat shrink is great for battery use, but it can sometimes become brittle over time and begin to crack at the edges or at sharp corners. One method around this is to use multiple layers. This strengthens the heat shrink and adds a second line of defense if one layer should begin to crack. It also allows you to use multiple pieces of heat shrink perpendicular to each other to cover all six sides of a battery instead of just four sides, thus completely sealing your battery. Adding a thin layer of foam around your battery can also help prevent cracking of the heat shrink over time.
Thicker rubber style heat shrink is also available. This heat shrink can usually stand up to more abuse, but is also more expensive in the large sizes needed for battery use.
What size heat shrink do I need?
This is a really common question in battery building. It’s actually quite simple to determine, especially for square shapes.
First, you have to understand the sizes of heat shrink. Unlike small heat shrink for wires that is measured by the diameter, large size heat shrink is usually measured by the flattened width instead of the diameter. This is because it comes flattened on a roll and this method of measurement is easier. The flattened with is also half of the circumference of the circle formed by the heat shrink when it is opened.
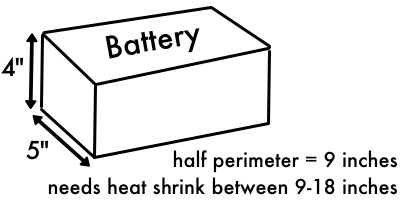
Now to calculate the size heat shrink we need, we first calculate the perimeter of our battery. With the 4 inch thick and 5 inch wide battery below, we simply add the height and width together to get 9 inches (which is also half the perimeter of our battery). Since most heat shrink has a shrink ratio of 2:1, we need a piece of heat shrink with a half circumference size of at least 9 inches. But we also need to make sure that the heat shrink is less than twice the size of the battery, meaning it can’t have a half circumference size of more than 18. That means we need a piece of heat shrink that is between 9-18 inches. Ideally, we’ll choose a piece that is closer to 9 inches so that it squeezes tighter on the battery.
If that sounds complicated, then here’s the simple version: add the height and width of your battery to get a number. Then multiply that number by 2. You need a size of heat shrink between those two numbers.
Most heat shrink is measured in metric sizes, so you if you calculated in inches, you’ll need to convert to millimeters. Just multiply your inches by 25.4 to get millimeters. So instead of 9 inch heat shrink, we need at least 228 millimeter heat shrink.
Installing your heat shrink
To actually install your heat shrink, make sure you have all of your connections finished and that you’ve tested your battery. It’s annoying to have to cut open the heat shrink if you forgot something.
Once you know your battery is ready, prepare it by adding a layer of foam or fiberglass panels around the outside of your battery. You can skip this step, but it will help to reduce the stress on the heat shrink wrap from all of the terminal cap posts.
Next, making sure your wires are out of the way, slide a piece of heat shrink over your battery. Make sure the piece is long enough to over hand each side of the battery by at least half an inch.
Now, start adding heat from either a strong hair dryer set on ‘high’ or a heat gun set on ‘low’. Don’t use a heat gun set on ‘high’, it can melt the heat shrink.
Start on the ends of the battery, heating the heat shrink until it wraps around the corners of the battery. This will help keep it snug. Then heat the middle of the heat shrink, turning the battery to heat all of the heat shrink evenly.
Once that piece is fully shrunk on the battery, you have the option of adding a second piece at a 90 degree angle to the first. This will allow you to cover the two ends that were left exposed. This isn’t completely necessary, but can help make your battery more waterproof, if that is an issue. It can also help keep foreign objects (wires, fingers, insects, etc) from entering your battery.
And that’s it! Installing heat shrink was simple, right?! If you ever need to open your battery, slide the heat shrink open carefully, especially if using a metal blade. Try to cut away from the terminals to avoid short circuiting the terminals with the blade. Good luck on finishing your battery! Remember to head on over to the forum and share your battery building process with us!
| About The Author | |
|---|---|
 |
Micah Toll is a mechanical engineer, lithium battery builder and ebike educator. He’s written multiple books including DIY Lithium Batteries (an Amazon #1 Bestseller!) and The Ultimate DIY Ebike Guide (an Amazon #2 Bestseller!). When he’s not tooting around Tel Aviv or Florida on his ebikes, you can probably find him reading, writing, running or vegging out on the couch. |

